public static Boolean validateEmail(String email) {
String EMAIL_PATTERN = "^[_A-Za-z0-9-\\+]+(\\.[_A-Za-z0-9-]+)*@"
+ "[A-Za-z0-9-]+(\\.[A-Za-z0-9]+)*(\\.[A-Za-z]{2,})$";
Pattern pattern = Pattern.compile(EMAIL_PATTERN);
Matcher matcher = pattern.matcher(email);
return matcher.matches();
}
Showing posts with label Java. Show all posts
Showing posts with label Java. Show all posts
Sunday, August 21, 2016
Validate email with regex

Convert InputStream to JSONObject
/**
* JSON object input stream.
*
* @param in
* the in
* @return the JSON object
* @throws IOException
* Signals that an I/O exception has occurred.
*/
public static JSONObject jsonObjectInputStream(InputStream in)
throws IOException {
String line;
BufferedReader br = new BufferedReader(new InputStreamReader(in,
Charset.forName("UTF-8")));
JSONObject json = new JSONObject();
while ((line = br.readLine()) != null) {
try {
json = new JSONObject(line);
} catch (JSONException e) {
return null;
}
}
return json;
}
Send sms via twilio api
String login = "ACCOUNT_SID" + ":" + "AUTH_TOKEN";
String base64login = new String(Base64.encodeBase64(login.getBytes()));
String phoneNumber = "+14222456789";
String messageText = "Hello, World!";
try {
Response response = Jsoup
.connect(
"https://api.twilio.com/2010-04-01/Accounts/{ACCOUNT_SID}/Messages.json")
.header("Authorization", "Basic " + base64login)
.timeout(10000).method(Method.POST).data("To", phoneNumber)
.data("From", "+14211456789").data("Body", messageText)
.execute();
if (response.statusCode() == 201) {
System.out.println("send message");
} else {
System.out.println("Message Send Failure");
}
} catch (IOException e) {
// TODO Auto-generated catch block
e.printStackTrace();
}
Calculate age in Java
public static int getAge(long dateOfBirth) {
Calendar today = Calendar.getInstance();
Calendar birthDate = Calendar.getInstance();
int age = 0;
birthDate.setTimeInMillis(dateOfBirth);
if (birthDate.after(today)) {
return -1;
}
age = today.get(Calendar.YEAR) - birthDate.get(Calendar.YEAR);
// If birth date is greater than todays date (after 2 days adjustment of
// leap year) then decrement age one year
if ((birthDate.get(Calendar.DAY_OF_YEAR)
- today.get(Calendar.DAY_OF_YEAR) > 3)
|| (birthDate.get(Calendar.MONTH) > today.get(Calendar.MONTH))) {
age--;
// If birth date and todays date are of same month and birth day of
// month is greater than todays day of month then decrement age
} else if ((birthDate.get(Calendar.MONTH) == today.get(Calendar.MONTH))
&& (birthDate.get(Calendar.DAY_OF_MONTH) > today
.get(Calendar.DAY_OF_MONTH))) {
age--;
}
return age;
}
Convert List String to bytes and bytes to List String
/**
* Convert list string to bytes array.
*
* @param listString
* the list string
* @return the byte[]
* @throws IOException
* Signals that an I/O exception has occurred.
*/
public static byte[] convertListStringToBytesArray(List<String> listString)
throws IOException {
ByteArrayOutputStream baos = new ByteArrayOutputStream();
DeflaterOutputStream out = new DeflaterOutputStream(baos);
DataOutputStream dos = new DataOutputStream(out);
for (String i : listString) {
dos.writeUTF(i);
;
}
dos.close();
out.close();
baos.close();
return baos.toByteArray();
}
/**
* Convert bytes array to list string.
*
* @param byteArrays
* the byte arrays
* @return the list
* @throws IOException
* Signals that an I/O exception has occurred.
*/
public static List<String> convertBytesArrayToListString(byte[] byteArrays)
throws IOException {
ByteArrayInputStream bais = new ByteArrayInputStream(byteArrays);
InflaterInputStream iis = new InflaterInputStream(bais);
DataInputStream dins = new DataInputStream(iis);
List<String> listRs = new ArrayList<String>();
while (true) {
try {
String value = dins.readUTF();
listRs.add(value);
} catch (EOFException e) {
break;
}
}
dins.close();
iis.close();
bais.close();
return listRs;
}
Saturday, August 20, 2016
Getting a name for someone to connect back to your server
When doing test automation it is often the case you need to know the
name of the current machine in order to prompt another machine to
connect to it, particularly if you are running your tests in parallel.
This week I was trying to get the server under test to connect back to a
WireMock server running on the slave test machine.
The standard response on stack overflow is to use the following pattern to get a network address. In my version here if we can’t resolve the name then we are assuming we are running on a developers laptop on VPN so all the tests are run on the same machine. (Hence localhost)
The standard response on stack overflow is to use the following pattern to get a network address. In my version here if we can’t resolve the name then we are assuming we are running on a developers laptop on VPN so all the tests are run on the same machine. (Hence localhost)
String hostName = "localhost";
try {
    InetAddress addr = InetAddress.getLocalHost();
    String suggestedName = addr.getCanonicalHostName();
    // Rough test for IP address, if IP address assume a local lookup
    // on VPN
    if (!suggestedName.matches("(\\d{1,3}\\.?){4}") && !suggestedName.contains(":")) {
        hostName = suggestedName;
    }
} catch (UnknownHostException ex) {
}

System.out.println(hostName);
The problem comes is that we have to trust the local machine settings,
for example /etc/hostname, which can result in a network name that is
not accessible from another machine. To counter this I wrote the
following code to work over the available network interfaces to find a
remotely addressable network address name that can be used to talk back
to this machine. (I could use an IP address but they are harder to
remember, particularly as we are moving towards IPv6)
String hostName = stream(wrap(NetworkInterface::getNetworkInterfaces).get())
        // Only alllow interfaces that are functioning
        .filter(wrap(NetworkInterface::isUp))
        // Flat map to any bound addresses
        .flatMap(n -> stream(n.getInetAddresses()))
        // Fiter out any local addresses
        .filter(ia -> !ia.isAnyLocalAddress() && !ia.isLinkLocalAddress() && !ia.isLoopbackAddress())
        // Map to a name
        .map(InetAddress::getCanonicalHostName)
        // Ignore if we just got an IP back
        .filter(suggestedName -> !suggestedName.matches("(\\d{1,3}\\.?){4}")
                                 && !suggestedName.contains(":"))
        .findFirst()
        // In my case default to localhost
        .orElse("localhost");

System.out.println(hostName);
You might notice there a are a few support methods being used in there
to tidy up the code, here are the required support methods if you are
interested.
@FunctionalInterface
public interface ThrowingPredicate<T, E extends Exception>{

    boolean test(T t) throws E;
}

@FunctionalInterface
public interface ThrowingSupplier<T, E extends Exception>{

    T get() throws E;
}

public static <T, E extends Exception> Predicate<T> wrap(ThrowingPredicate<T, E> th) {
    return t -> {
        try {
            return th.test(t);
        } catch (Exception ex) {
            throw new RuntimeException(ex);
        }
    };
}

public static <T, E extends Exception> Supplier<T> wrap(ThrowingSupplier<T, E> th) {
    return () -> {
        try {
            return th.get();
        } catch (Exception ex) {
            throw new RuntimeException(ex);
        }
    };
}

// http://stackoverflow.com/a/23276455
public static <T> Stream<T> stream(Enumeration<T> e) {
    return StreamSupport.stream(
            Spliterators.spliteratorUnknownSize(
                    new Iterator<T>() {
                public T next() {
                    return e.nextElement();
                }

                public boolean hasNext() {
                    return e.hasMoreElements();
                }
            },
                    Spliterator.ORDERED), false);
}
Reference: Getting a name for someone to connect back to your server from our JCG partner Gerard Davison at the Gerard Davison’s blog blog.
Token Authentication for Java Applications
Building Identity Management, including authentication and authorization? Try Stormpath! Our REST API and robust Java SDK support can eliminate your security risk and can be implemented in minutes. Sign up, and never build auth again!
Update 5/12/2016: Building a Java application? JJWT is a Java library providing end-to-end JWT creation and verification, developed by our very own Les Hazlewood. Forever free and open-source (Apache License, Version 2.0), JJWT is simple to use and understand. It was designed with a builder-focused fluent interface hiding most of its complexity. We’d love to have you try it out, and let us know what you think! (And, if you’re a Node developer, check out NJWT!)
In my last post, we covered a lot of ground, including how we traditionally go about securing websites, some of the pitfalls of using cookies and sessions, and how to address those pitfalls by traditional means.
In this post we’ll go beyond the traditional and take a deep dive into how token authentication with JWTs (JSON Web Tokens) not only addresses these concerns, but also gives us the benefit of inspectable meta-data and strong cryptographic signatures.
Authentication is proving that a user is who they say they are.
A token is a self-contained singular chunk of information. It could have intrinsic value or not. We are going to look at a particular type of token that does have intrinsic value and addresses a number of the concerns with session IDs.
URL-safe is a fancy way of saying that the entire string is encoded so there are no special characters and the token can fit in a URL.
The string is opaque and can be used standalone in much the same way that session IDs are used. By opaque, I mean that looking at the string itself provides no additional information.
However, the string can also be decoded to pull out-meta data and it’s signature can be cryptographically verified so that your application knows that the token has not been tampered with.
JWTs can be stored in cookies, but all the rules for cookies we discussed before still apply. You can entirely replace your session id with a JWT. You can then gain the additional benefit of accessing the meta-information directly from that session id.
In the wild, they look like just another ugly string:
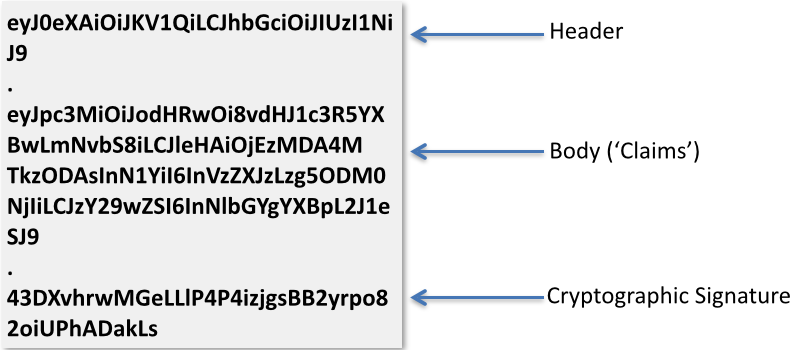
Here are the parts decoded:
Header
The above parts of the claim are all included in the JWT specification.
One advantage of JWTs is that arbitrary data can be encoded into the claims as with
NOTE: It is still critical and a best practice for the server to always verify actions taken by the client. If, for instance, some administrative action was being taken on the client, you would still want to verify on the application server that the current user had permission to perform that action. You would never rely on client side authorization information alone.
You may have picked up on another advantage: the cryptographic signature. The signature can be verified which proves that the JWT has not been tampered with. Note that the presence of a crytpographic signature does not guarantee confidentiality. Confidentiality is ensured only when the JWT is encrypted as well as signed.
Now, for the big kicker: statelessness. While the server will need to generate the JWT, it does not need to store it anywhere as all of the user meta-data is encoded right in to the JWT. The server and client could pass the JWT back and forth and never store it. This scales very well.
You have to address issues like: How long should the token be good for? How will you revoke it? (There’s a whole other post we could do on refresh tokens.)
You have to be mindful of what you store in the JWT if they are not encrypted. Do not store any sensitive information. It is generally accepted practice to store a user identifier in the form of the
How do you create a JWT? Easy peasy!
The first thing to notice is the fluent builder api used to create a JWT. Method calls are chained culminating in the
Also notice that when we are setting one of the claims from the specification, we use a setter. For example:
It’s just as easy to verify a JWT.
If the JWT has been tampered with in any way, parsing the claims will throw a
There’s a lot of confusion around the OAuth2 spec. That’s, in part, because it is really an über spec – it has a lot of complexity. It’s also because OAuth1.a and OAuth2 are very different beasts. We are going to look at a very specific, easy to use, subset of the OAuth2 spec. We have an excellent post that goes into much more detail on What the Heck is OAuth. Here, we’ll give some brief background and then jump right into the examples.
OAuth2 is basically a protocol that supports authorization workflows. What this means is that it gives you a way to ensure that a specific user has permissions to do something.
That’s it.
OAuth2 isn’t meant to do stuff like validate a user’s identity — that’s taken care of by an Authentication service. Authentication is when you validate a user’s identity (like asking for a username / password to log in), whereas authorization is when you check to see what permissions an existing user already has.
Just remember that OAuth2 is a protocol for authorization.
There’s another grant type known as
The key line, for the purposes of this demonstration is:
Behind the scenes,
NOTE: This assumes that you’ve already setup a Stormpath account and that your api keys are located in
The
There’s a lot going on here, so let’s break it down.
On the first line, I am telling
The response has a
We gave an overview of the OAuth2 protocol and went through a detailed example of how Stormpath’s implementation of OAuth2 uses JWTs.
Here are some other links to posts on token based authentication, JWTs and Spring Boot:
Update 5/12/2016: Building a Java application? JJWT is a Java library providing end-to-end JWT creation and verification, developed by our very own Les Hazlewood. Forever free and open-source (Apache License, Version 2.0), JJWT is simple to use and understand. It was designed with a builder-focused fluent interface hiding most of its complexity. We’d love to have you try it out, and let us know what you think! (And, if you’re a Node developer, check out NJWT!)
In my last post, we covered a lot of ground, including how we traditionally go about securing websites, some of the pitfalls of using cookies and sessions, and how to address those pitfalls by traditional means.
In this post we’ll go beyond the traditional and take a deep dive into how token authentication with JWTs (JSON Web Tokens) not only addresses these concerns, but also gives us the benefit of inspectable meta-data and strong cryptographic signatures.
Token Authentication to the Rescue!
Let’s first examine what we mean byauthentication and token in this context.Authentication is proving that a user is who they say they are.
A token is a self-contained singular chunk of information. It could have intrinsic value or not. We are going to look at a particular type of token that does have intrinsic value and addresses a number of the concerns with session IDs.
JSON Web Tokens (JWTs)
JWTs are a URL-safe, compact, self-contained string with meaningful information that is usually digitally signed or encrypted. They’re quickly becoming a de-facto standard for token implementations across the web.URL-safe is a fancy way of saying that the entire string is encoded so there are no special characters and the token can fit in a URL.
The string is opaque and can be used standalone in much the same way that session IDs are used. By opaque, I mean that looking at the string itself provides no additional information.
However, the string can also be decoded to pull out-meta data and it’s signature can be cryptographically verified so that your application knows that the token has not been tampered with.
JWTs and OAuth2 Access Tokens
Many OAuth2 implementations are using JWTs for their access tokens. It should be stated that the OAuth2 and JWT specifications are completely separate from each other and don’t have any dependencies on each other. Using JWTs as the token mechanism for OAuth2 affords a lot of benefit as we’ll see below.JWTs can be stored in cookies, but all the rules for cookies we discussed before still apply. You can entirely replace your session id with a JWT. You can then gain the additional benefit of accessing the meta-information directly from that session id.
In the wild, they look like just another ugly string:
If you look carefully, you can see that there are two periods in the string. These are significant as they delimit different sections of the JWT.eyJ0eXAiOiJKV1QiLCJhbGciOiJIUzI1NiJ9.eyJpc3MiOiJodHRwOi8vdHJ1c3R5YXBwLmNvbS8iLCJleHAiOjEzMDA4MTkzODAsInN1YiI6InVzZXJzLzg5ODM0NjIiLCJzY29wZSI6InNlbGYgYXBpL2J1eSJ9.43DXvhrwMGeLLlP4P4izjgsBB2yrpo82oiUPhADakLs
eyJ0eXAiOiJKV1QiLCJhbGciOiJIUzI1NiJ9
.
eyJpc3MiOiJodHRwOi8vdHJ1c3R5YXBwLmNvbS8iLCJleHAiOjEzMDA4MTkzODAsInN1YiI6InVzZXJzLzg5ODM0NjIiLCJzY29wZSI6InNlbGYgYXBpL2J1eSJ9
.
43DXvhrwMGeLLlP4P4izjgsBB2yrpo82oiUPhADakLs
JWT Structure
JWTs have a three part structure, each of which is base64-encoded:
Here are the parts decoded:
Header
{
  "typ": "JWT",
  "alg": "HS256"
}
Claims
{
  "iss":"http://trustyapp.com/",
  "exp": 1300819380,
  "sub": "users/8983462",
  "scope": "self api/buy"
}
Cryptographic Signaturetß´—™à%O˜v+nî…SZu¯µ€U…8H×
JWT Claims
Let’s examine the claims sections. Each type of claim that is part of the JWT Specification can be found here.iss is who issued the token.exp is when the token expires.sub is the subject of the token. This is usually a user identifier of some sort.The above parts of the claim are all included in the JWT specification.
scope
is not included in the specification, but it is commonly used to
provide authorization information. That is, what parts of the
application the user has access to.One advantage of JWTs is that arbitrary data can be encoded into the claims as with
scope
above. Another advantage is that the client can now react to this
information without any further interaction with the server. For
instance, a portion of the page may be hidden based on the data found in
thescope claim.NOTE: It is still critical and a best practice for the server to always verify actions taken by the client. If, for instance, some administrative action was being taken on the client, you would still want to verify on the application server that the current user had permission to perform that action. You would never rely on client side authorization information alone.
You may have picked up on another advantage: the cryptographic signature. The signature can be verified which proves that the JWT has not been tampered with. Note that the presence of a crytpographic signature does not guarantee confidentiality. Confidentiality is ensured only when the JWT is encrypted as well as signed.
Now, for the big kicker: statelessness. While the server will need to generate the JWT, it does not need to store it anywhere as all of the user meta-data is encoded right in to the JWT. The server and client could pass the JWT back and forth and never store it. This scales very well.
Managing Bearer Token Security
Implicit trust is a tradeoff. These types of tokens are often referred to as Bearer Tokens because all that is required to gain access to the protected sections of an application is the presentation of a valid, unexpired token.You have to address issues like: How long should the token be good for? How will you revoke it? (There’s a whole other post we could do on refresh tokens.)
You have to be mindful of what you store in the JWT if they are not encrypted. Do not store any sensitive information. It is generally accepted practice to store a user identifier in the form of the
subclaim. When a JWT is signed, it’s referred to as a JWS. When it’s encrypted, it’s referred to as a JWE.Java, JWT and You!
We are very proud of the JJWT project on Github. Primarily authored by Stormpath’s own CTO, Les Hazlewood, it’s a fully open-source JWT solution for Java. It’s the easiest to use and understand library for creating and verifying JSON Web Tokens on the JVM.How do you create a JWT? Easy peasy!
import io.jsonwebtoken.Jwts;
import io.jsonwebtoken.SignatureAlgorithm;

byte[] key = getSignatureKey();

String jwt =
    Jwts.builder().setIssuer("http://trustyapp.com/")
        .setSubject("users/1300819380")
        .setExpiration(expirationDate)
        .put("scope", "self api/buy")
        .signWith(SignatureAlgorithm.HS256,key)
        .compact();
The first thing to notice is the fluent builder api used to create a JWT. Method calls are chained culminating in the
compact call which returns the final JWT string.Also notice that when we are setting one of the claims from the specification, we use a setter. For example:
.setSubject("users/1300819380"). When a custom claim is set, we use a call to put and specify both the key and value. For example: .put("scope", "self api/buy")It’s just as easy to verify a JWT.
String subject = "HACKER";
try {
    Jws jwtClaims =
        Jwts.parser().setSigningKey(key).parseClaimsJws(jwt);

    subject = claims.getBody().getSubject();

    //OK, we can trust this JWT

} catch (SignatureException e) {

    //don't trust the JWT!
}
If the JWT has been tampered with in any way, parsing the claims will throw a
SignatureExceptionand the value of the subject variable will stay HACKER. If it’s a valid JWT, then subject will be extracted from it: claims.getBody().getSubject()What is OAuth?
In the next section, we’ll look at an example using Stormpath’s OAuth2 implementation, which makes use of JWTs.There’s a lot of confusion around the OAuth2 spec. That’s, in part, because it is really an über spec – it has a lot of complexity. It’s also because OAuth1.a and OAuth2 are very different beasts. We are going to look at a very specific, easy to use, subset of the OAuth2 spec. We have an excellent post that goes into much more detail on What the Heck is OAuth. Here, we’ll give some brief background and then jump right into the examples.
OAuth2 is basically a protocol that supports authorization workflows. What this means is that it gives you a way to ensure that a specific user has permissions to do something.
That’s it.
OAuth2 isn’t meant to do stuff like validate a user’s identity — that’s taken care of by an Authentication service. Authentication is when you validate a user’s identity (like asking for a username / password to log in), whereas authorization is when you check to see what permissions an existing user already has.
Just remember that OAuth2 is a protocol for authorization.
Using OAuth Grant Types for Authorization
Let’s look at a typical OAuth2 interaction.POST /oauth/token HTTP/1.1 Origin: https://foo.com Content-Type: application/x-www-form-urlencoded grant_type=password&username=username&password=password
grant_type is required. The application/x-www-form-urlencoded
content type is required for this type of interaction as well. Given
that you are passing the username and password over the wire, you would always
want the connection to be secure. The good thing, however, is that the
response will have an OAuth2 bearer token. This token will then be used
for every interaction between the browser and server going forward.
There is a very brief exposure here where the username and password are
passed over the wire. Assuming the authentication service on the server
verifies the username and password, here’s the response:
HTTP/1.1 200 OK
Content-Type: application/json;charset=UTF-8
Cache-Control: no-store
Pragma: no-cache

{
    "access_token":"2YotnFZFEjr1zCsicMWpAA...",
    "token_type":"example",
    "expires_in":3600,
    "refresh_token":"tGzv3JOkF0XG5Qx2TlKWIA...",
    "example_parameter":"example_value"
}
Notice the Cache-Control and Pragma headers. We don’t want this response being cached anywhere. The access_token
is what will be used by the browser in subsequent requests. Again,
there is not direct relationship between OAuth2 and JWT. However, the access_token
can be a JWT. That’s where the extra benefit of the encoded meta-data
comes in. Here’s how the access token is leveraged in future requests:TheGET /admin HTTP/1.1 Authorization: Bearer 2YotnFZFEjr1zCsicMW...
Authorization header is a standard header. No custom headers are required to use OAuth2. Rather than the type being Basic, in this case the type is Bearer. The access token is included directly after the Bearer
keyword. This completes the OAuth2 interaction for the password grant
type. Every subsequent request from the browser can use the Authorizaion: Bearer header with the access token.There’s another grant type known as
client_credentials which uses client_id andclient_secret, rather than username and password.
This grant type is typically used for API interactions. While the
client id and slient secret function similarly to a username and
password, they are usually of a higher quality security and not
necessarily human readable.Take Us Home: OAuth2 Java Example
We’ve arrived! It’s time to dig into some specific code that demonstrates JWTs in action.Spring Boot Web MVC
There are a number of examples in the Stormpath Java SDK. Here, we are going to look at a Spring Boot Web MVC example. Here’s the HelloController from the example:
@RestController
public class HelloController {

    @RequestMapping("/")
    String home(HttpServletRequest request) {

        String name = "World";

        Account account = AccountResolver.INSTANCE.getAccount(request);
        if (account != null) {
            name = account.getGivenName();
        }

        return "Hello " + name + "!";
    }

}
The key line, for the purposes of this demonstration is:
Account account = AccountResolver.INSTANCE.getAccount(request);Behind the scenes,
account will resolve to an Account object (and not be null) ONLY if an authenticated session is present.Build and Run the Example Code
To build and run this example, do the following:☺ dogeared jobs:0 ~/Projects/StormPath/stormpath-sdk-java (master|8100m) ➥ cd examples/spring-boot-webmvc/ ☺ dogeared jobs:0 ~/Projects/StormPath/stormpath-sdk-java/examples/spring-boot-webmvc (master|8100m) ➥ mvn clean package [INFO] Scanning for projects... [INFO] [INFO] ------------------------------------------------------------------------ [INFO] Building Stormpath Java SDK :: Examples :: Spring Boot Webapp 1.0.RC4.6-SNAPSHOT [INFO] ------------------------------------------------------------------------ ... skipped output ... [INFO] ------------------------------------------------------------------------ [INFO] BUILD SUCCESS [INFO] ------------------------------------------------------------------------ [INFO] Total time: 4.865 s [INFO] Finished at: 2015-08-04T11:46:05-04:00 [INFO] Final Memory: 31M/224M [INFO] ------------------------------------------------------------------------ ☺ dogeared jobs:0 ~/Projects/StormPath/stormpath-sdk-java/examples/spring-boot-webmvc (master|8100m
Launch the Spring Boot Example
You can then launch the Spring Boot example like so:☺ dogeared jobs:0 ~/Projects/StormPath/stormpath-sdk-java/examples/spring-boot-webmvc (master|8104m) ➥ java -jar target/stormpath-sdk-examples-spring-boot-web-1.0.RC4.6-SNAPSHOT.jar . ____ _ __ _ _ /\\ / ___'_ __ _ _(_)_ __ __ _ \ \ \ \ ( ( )\___ | '_ | '_| | '_ \/ _` | \ \ \ \ \\/ ___)| |_)| | | | | || (_| | ) ) ) ) ' |____| .__|_| |_|_| |_\__, | / / / / =========|_|==============|___/=/_/_/_/ :: Spring Boot :: (v1.2.1.RELEASE) 2015-08-04 11:51:00.127 INFO 17973 --- [ main] tutorial.Application : Starting Application v1.0.RC4.6-SNAPSHOT on MacBook-Pro.local with PID 17973 ... skipped output ... 2015-08-04 11:51:04.558 INFO 17973 --- [ main] s.b.c.e.t.TomcatEmbeddedServletContainer : Tomcat started on port(s): 8080 (http) 2015-08-04 11:51:04.559 INFO 17973 --- [ main] tutorial.Application : Started Application in 4.599 seconds (JVM running for 5.103)
NOTE: This assumes that you’ve already setup a Stormpath account and that your api keys are located in
~/.stormpath/apiKey.properties. Look here for more information on quick setup up of Stormpath with Spring Boot.Authenticate with a JSON Web Token (or Not)
Now, we can exercise the example and show some JWTs in action! First, hit your endpoint without any authentication. I like to use httpie, but any command line http client will do.➥ http -v localhost:8080 GET / HTTP/1.1 Accept: */* Accept-Encoding: gzip, deflate Connection: keep-alive Host: localhost:8080 User-Agent: HTTPie/0.9.2 HTTP/1.1 200 OK Accept-Charset: big5, big5-hkscs, cesu-8, euc-jp, euc-kr, gb18030, ... Content-Length: 12 Content-Type: text/plain;charset=UTF-8 Date: Tue, 04 Aug 2015 15:56:41 GMT Server: Apache-Coyote/1.1 Hello World!
The
-v parameter produces verbose output and shows all
the headers for the request and the response. In this case, the output
message is simply: Hello World!. This is because there is not an established session.Authenticate with the Stormpath OAuth Endpoint
Now, let’s hit theoauth endpoint so that our server can authenticate with Stormpath. You may ask, “What oauth
endpoint?” The controller above doesn’t indicate any such endpoint. Are
there other controllers with other endpoints in the example? No, there
are not! Stormpath gives you oauth (and many other) endpoints right
out-of-the-box. Check it out:
➥ http -v --form POST http://localhost:8080/oauth/token  \
> 'Origin:http://localhost:8080' \
> grant_type=password username=micah+demo.jsmith@stormpath.com password=
POST /oauth/token HTTP/1.1
Content-Type: application/x-www-form-urlencoded; charset=utf-8
Host: localhost:8080
Origin: http://localhost:8080
User-Agent: HTTPie/0.9.2

grant_type=password&username=micah%2Bdemo.jsmith%40stormpath.com&password=

HTTP/1.1 200 OK
Cache-Control: no-store
Content-Length: 325
Content-Type: application/json;charset=UTF-8
Date: Tue, 04 Aug 2015 16:02:08 GMT
Pragma: no-cache
Server: Apache-Coyote/1.1
Set-Cookie: account=eyJhbGciOiJIUzI1NiJ9.eyJqdGkiOiIxNDQyNmQxMy1mNThiLTRhNDEtYmVkZS0wYjM0M2ZjZDFhYzAiLCJpYXQiOjE0Mzg3MDQxMjgsInN1YiI6Imh0dHBzOi8vYXBpLnN0b3JtcGF0aC5jb20vdjEvYWNjb3VudHMvNW9NNFdJM1A0eEl3cDRXaURiUmo4MCIsImV4cCI6MTQzODk2MzMyOH0.wcXrS5yGtUoewAKqoqL5JhIQ109s1FMNopL_50HR_t4; Expires=Wed, 05-Aug-2015 16:02:08 GMT; Path=/; HttpOnly

{
    "access_token": "eyJhbGciOiJIUzI1NiJ9.eyJqdGkiOiIxNDQyNmQxMy1mNThiLTRhNDEtYmVkZS0wYjM0M2ZjZDFhYzAiLCJpYXQiOjE0Mzg3MDQxMjgsInN1YiI6Imh0dHBzOi8vYXBpLnN0b3JtcGF0aC5jb20vdjEvYWNjb3VudHMvNW9NNFdJM1A0eEl3cDRXaURiUmo4MCIsImV4cCI6MTQzODk2MzMyOH0.wcXrS5yGtUoewAKqoqL5JhIQ109s1FMNopL_50HR_t4",
    "expires_in": 259200,
    "token_type": "Bearer"
}
There’s a lot going on here, so let’s break it down.
On the first line, I am telling
httpie that I want to make a form url-encoded POST – that’s what the --form and POST parameters do. I am hitting the /oauth/token endpoint of my locally running server. I specify an Origin header. This is required to interact with Stormpath for the security reasons we talked about previously. As per the OAuth2 spec, I am passing up grant_type=password along with ausername and password.The response has a
Set-Cookie
header as well as a JSON body containing the OAuth2 access token. And
guess what? That access token is also a JWT. Here are the claims
decoded:
{
  "jti": "14426d13-f58b-4a41-bede-0b343fcd1ac0",
  "iat": 1438704128,
  "sub": "https://api.stormpath.com/v1/accounts/5oM4WI3P4xIwp4WiDbRj80",
  "exp": 1438963328
}
Notice the sub key. That’s the full Stormpath URL to the
account I authenticated as. Now, let’s hit our basic Hello World
endpoint again, only this time, we will use the OAuth2 access token:Notice on the last line of the output that the message addresses us by name. Now that we’ve established an authenticated session with Stormpath using OAuth2, these lines in the controller retrieve the first name:➥ http -v localhost:8080 \ > 'Authorization: Bearer eyJhbGciOiJIUzI1NiJ9.eyJqdGkiOiIxNDQyNmQxMy1mNThiLTRhNDEtYmVkZS0wYjM0M2ZjZDFhYzAiLCJpYXQiOjE0Mzg3MDQxMjgsInN1YiI6Imh0dHBzOi8vYXBpLnN0b3JtcGF0aC5jb20vdjEvYWNjb3VudHMvNW9NNFdJM1A0eEl3cDRXaURiUmo4MCIsImV4cCI6MTQzODk2MzMyOH0.wcXrS5yGtUoewAKqoqL5JhIQ109s1FMNopL_50HR_t4' GET / HTTP/1.1 Authorization: Bearer eyJhbGciOiJIUzI1NiJ9.eyJqdGkiOiIxNDQyNmQxMy1mNThiLTRhNDEtYmVkZS0wYjM0M2ZjZDFhYzAiLCJpYXQiOjE0Mzg3MDQxMjgsInN1YiI6Imh0dHBzOi8vYXBpLnN0b3JtcGF0aC5jb20vdjEvYWNjb3VudHMvNW9NNFdJM1A0eEl3cDRXaURiUmo4MCIsImV4cCI6MTQzODk2MzMyOH0.wcXrS5yGtUoewAKqoqL5JhIQ109s1FMNopL_50HR_t4 Connection: keep-alive Host: localhost:8080 User-Agent: HTTPie/0.9.2 HTTP/1.1 200 OK Content-Length: 11 Content-Type: text/plain;charset=UTF-8 Date: Tue, 04 Aug 2015 16:44:28 GMT Server: Apache-Coyote/1.1 Hello John!
Account account = AccountResolver.INSTANCE.getAccount(request);
if (account != null) {
    name = account.getGivenName();
}
Summary: Token Authentication for Java Apps
In this post, we’ve looked at how token authentication with JWTs not only addresses the concerns of traditional approaches, but also gives us the benefit of inspectable meta-data and strong cryptographic signatures.We gave an overview of the OAuth2 protocol and went through a detailed example of how Stormpath’s implementation of OAuth2 uses JWTs.
Here are some other links to posts on token based authentication, JWTs and Spring Boot:
- Token Based Authentication for Angular.js
- JJWT – JSON Web Token for Java and Android
- Spring Boot Webapp Sample Quickstart
- JWT Specification
The 12 Step Program to Realizing Your Java Monitoring is Flawed
What are some of the biggest problems with the current state of Java monitoring?
Errors in production are much like drunk texting. You only realize something went wrong after it had already happened. Texting logs are usually more amusing than application error logs, but… both can be equally hard to fix.
In this post we’ll go through a 12 step monitoring flaws rehab program. A thought experiment backed by the experience of Takipi’s users with some of the most common problems that you’re likely to encounter – And what you can do about them.
Let’s roll.
When we take a step closer, the reliability problem is made up of many other symptoms with the current state of monitoring and logging. These are thorny issues that most people try to bury or avoid altogether. But in this post, we’re putting them in the spotlight.
Bottom line: Troubleshooting and handling new errors that show up in production is unavoidable.
A big part of this is misusing exceptions and logged errors as part of the application’s control flow, clogging up logs with the paradox of “normal” exceptions. You can read more about this in the recent eBook we released right here.
As the cost for monitoring and data retention goes lower, the problem shifts to collecting actionable data and making sense of it.
Bottom line: Even though it’s gradually getting easier to log and report on everything, error root cause discovery is still mostly manual, the haystack gets bigger and the needle is harder to find.
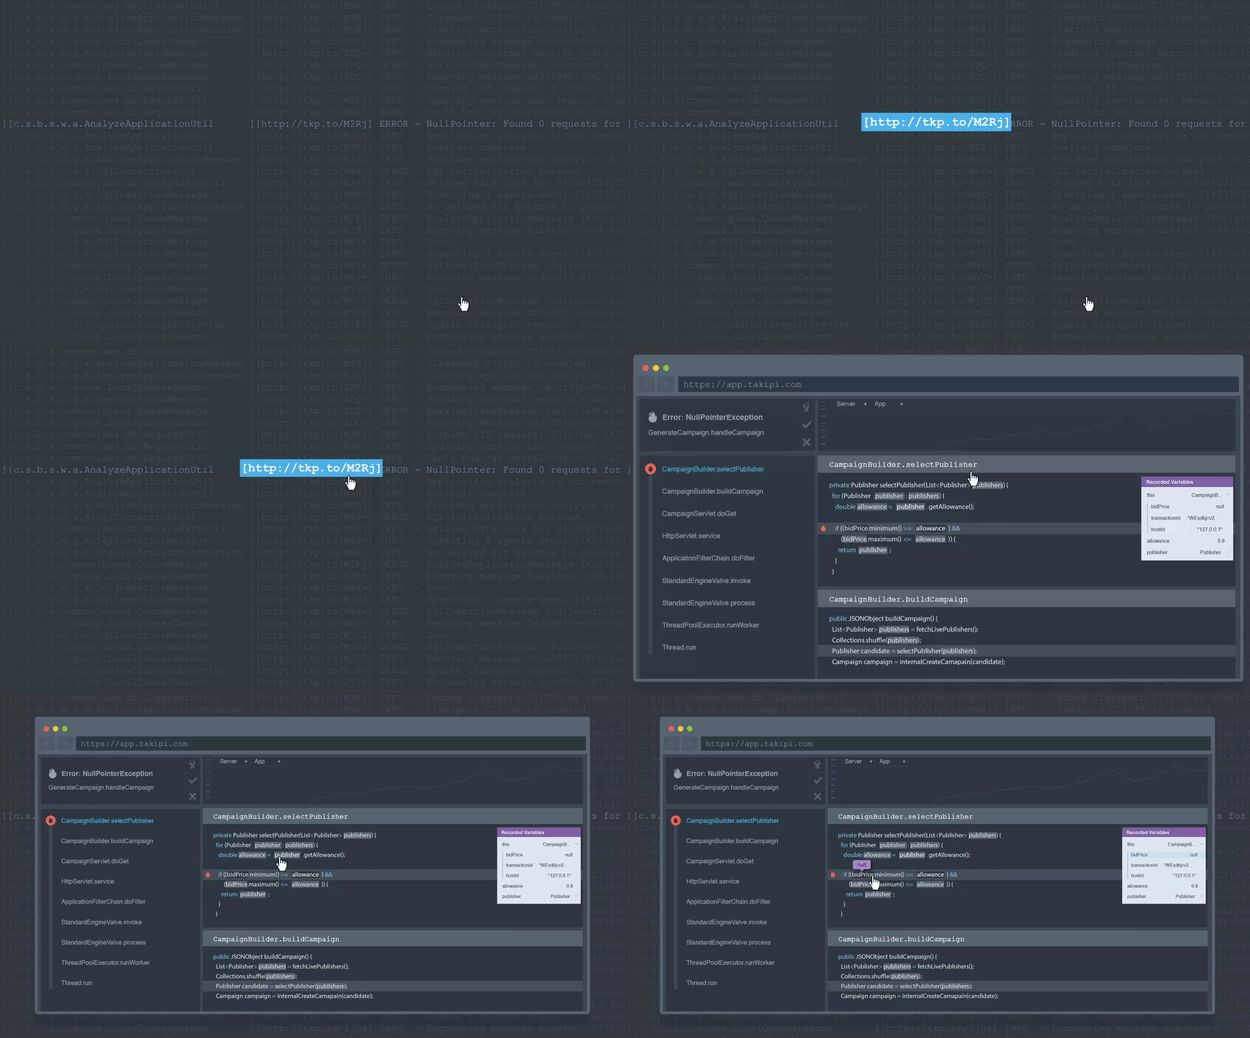
To make this process easier, developers who use Takipi are able to extend the context of each logged error, warning and exception into the source, state and variable state that caused it. Each log line gets a link appended to it that leads to the event’s analysis in Takipi:
Bottom line: Manually sifting through logs is a tedious process that can be avoided.
The way we solve this in Takipi is with a recently released new feature that gives you the ability to see the last 250 log statements within the thread leading up to an error. Even if they were not written to the log file in production.
Wait, what? Logless logging with no additional overhead. Since log statements are captured directly in-memory, without relying on log files, we’re able to do full verbosity, in production, without affecting log size or creating overhead. You can read more about it right here, or try it yourself.
Bottom line: As of today you’re not limited to WARN and above levels in production logging.
The hidden meaning of “can’t reproduce” is right at the source. If you’re used to first hearing about errors from users, there might be something wrong with the way errors are tracked internally. With proper monitoring in place, it’s possible to identify and solve errors before actual users report them.
Bottom line: Stop reproducing “cannot reproduce”.

In production.
Messing up real users.
That’s the production debugging paradox right there. A bug happens, you don’t have enough data to solve it (but you do have lots of noise), adding logging statements, build, test (the same test that missed the bug in the first place), deploy to production, hope for it to happen again, hope for the new data to be enough or… repeat.
Bottom line: The ultimate goal for a successful monitoring strategy would be to prevent this cycle from happening.
The fact is that even when a monitoring stack includes a solution from all 4 categories, the visibility you’re getting into application errors is limited. You’ll see the stack trace of the transaction, or at most specific predefined hardcoded variables. Traditional monitoring stacks have no visibility to the full state of the application at moment of error.
Bottom line: There’s a critical missing component in today’s common monitoring stack. Variable level visibility for production debugging.
While microservices promote the “Separation of Concerns” principle, they’re also introducing a plethora of new problems at a server level scale. In this previous post we covered these issues and offered possible solution strategies.
Bottom line: Any monitoring solution should take distributed errors into account and be able to stitch in troubleshooting data from multiple sources.
The ability to freeze a snapshot of the application state at moment of error, even if it comes from multiple services / sources is critical in this case, otherwise the important data can be lost.
Bottom line: Long troubleshooting cycles should be avoided.
Short feature cycles and long troubleshooting cycles just don’t go together. There should be a balance between the two. Monitoring is a team sport, and the tools have to know how to speak to each other. For example, at Takipi you’re able to get alerts on Slack, Pagerduty or Hipchat, and directly open a JIRA ticket with all the available error analysis data.
Bottom line: Collaborative workflows speed up issue resolution times.
Bottom line: Keep an eye out for developments in the tooling ecosystem and best practices from other companies.
We hope you’ve enjoyed this overview / rant of some of the main problems with the current state of monitoring. Are there any other issues with monitoring that keep you up at night?
Please feel free to share them in the comments section below.
Errors in production are much like drunk texting. You only realize something went wrong after it had already happened. Texting logs are usually more amusing than application error logs, but… both can be equally hard to fix.
In this post we’ll go through a 12 step monitoring flaws rehab program. A thought experiment backed by the experience of Takipi’s users with some of the most common problems that you’re likely to encounter – And what you can do about them.
Let’s roll.
Step #1: Admitting that we have a problem
In fact, it’s only one problem on a higher level, application reliability. To be able to quickly know when there’s something wrong with the application, and having quick access to all the information you need in order to fix it.When we take a step closer, the reliability problem is made up of many other symptoms with the current state of monitoring and logging. These are thorny issues that most people try to bury or avoid altogether. But in this post, we’re putting them in the spotlight.
Bottom line: Troubleshooting and handling new errors that show up in production is unavoidable.
Step #2: Shutting down monitoring information overload
A good practice is to collect everything you can about your application, but that’s only useful when the metrics are meaningful. Inconsistent logging and metrics telemetry generate more noise when their actionability is just an afterthought. Even if they result in beautiful dashboards.A big part of this is misusing exceptions and logged errors as part of the application’s control flow, clogging up logs with the paradox of “normal” exceptions. You can read more about this in the recent eBook we released right here.
As the cost for monitoring and data retention goes lower, the problem shifts to collecting actionable data and making sense of it.
Bottom line: Even though it’s gradually getting easier to log and report on everything, error root cause discovery is still mostly manual, the haystack gets bigger and the needle is harder to find.
Step #3: Avoiding tedious log analysis
Let’s assume we have some error, a specific transaction that fails some of the time. We now have to find all the relevant information about it in our log files. Time to grep our way through the logs, or play around with different queries in tools that make the search quicker like Splunk, ELK, or other log management tools.To make this process easier, developers who use Takipi are able to extend the context of each logged error, warning and exception into the source, state and variable state that caused it. Each log line gets a link appended to it that leads to the event’s analysis in Takipi:
Bottom line: Manually sifting through logs is a tedious process that can be avoided.
Step #4: Realizing that production log levels aren’t verbose enough
Log levels are a double edged sword. The more levels you log in production, the more context you have. BUT, the extra logging creates overhead that is best to avoid in production. Sometimes, the additional data you need would exist in a “DEBUG” or an “INFO” message, but production applications usually only write “WARN” level messages and above.The way we solve this in Takipi is with a recently released new feature that gives you the ability to see the last 250 log statements within the thread leading up to an error. Even if they were not written to the log file in production.
Wait, what? Logless logging with no additional overhead. Since log statements are captured directly in-memory, without relying on log files, we’re able to do full verbosity, in production, without affecting log size or creating overhead. You can read more about it right here, or try it yourself.
Bottom line: As of today you’re not limited to WARN and above levels in production logging.
Step #5: Next person who says “cannot reproduce” buys a round of drinks
Probably the most common excuse for deferring a bug fix is “can’t reproduce”. An error that lacks the state that cause it. Something bad happens, usually you first hear about it from an actual user, and can’t recreate it or find evidence in the logs / collected metrics.The hidden meaning of “can’t reproduce” is right at the source. If you’re used to first hearing about errors from users, there might be something wrong with the way errors are tracked internally. With proper monitoring in place, it’s possible to identify and solve errors before actual users report them.
Bottom line: Stop reproducing “cannot reproduce”.
Step #6: Breaking the log statements redeploy cycle
A common infamous and unfortunate cure for “cannot reproduce” is adding additional logging statements in production and hoping for the bug to happen again.In production.
Messing up real users.
That’s the production debugging paradox right there. A bug happens, you don’t have enough data to solve it (but you do have lots of noise), adding logging statements, build, test (the same test that missed the bug in the first place), deploy to production, hope for it to happen again, hope for the new data to be enough or… repeat.
Bottom line: The ultimate goal for a successful monitoring strategy would be to prevent this cycle from happening.
Step #7: APM + Trackers + Metrics + Logs = Limited visibility
Let’s step it up a notch. We’ve covered logs and dashboard reporting metrics, now it’s time to add error tracking tools and APMs to the mix.The fact is that even when a monitoring stack includes a solution from all 4 categories, the visibility you’re getting into application errors is limited. You’ll see the stack trace of the transaction, or at most specific predefined hardcoded variables. Traditional monitoring stacks have no visibility to the full state of the application at moment of error.
Bottom line: There’s a critical missing component in today’s common monitoring stack. Variable level visibility for production debugging.
Step #8: Preparing for distributed error monitoring
Monitoring doesn’t stop on the single server level, especially with microservice architectures where an error that formed on one server could be causing trouble elsewhere.While microservices promote the “Separation of Concerns” principle, they’re also introducing a plethora of new problems at a server level scale. In this previous post we covered these issues and offered possible solution strategies.
Bottom line: Any monitoring solution should take distributed errors into account and be able to stitch in troubleshooting data from multiple sources.
Step #9: Find a way around long troubleshooting cycles
Whether it’s an alerting issue or simply a matter of priorities, for most applications the troubleshooting cycle takes days, weeks or even months after the first error was introduced. The person who reported the error might be unreachable or worse, the relevant data could be long gone / rolled over due to data retention policies.The ability to freeze a snapshot of the application state at moment of error, even if it comes from multiple services / sources is critical in this case, otherwise the important data can be lost.
Bottom line: Long troubleshooting cycles should be avoided.
Step #10: Acknowledge the dev vs ops dilemma
Keeping up with release cycle issues, we’re all on the same boat, BUT, developers want to release features faster while operations would rather keep the production environment stable.Short feature cycles and long troubleshooting cycles just don’t go together. There should be a balance between the two. Monitoring is a team sport, and the tools have to know how to speak to each other. For example, at Takipi you’re able to get alerts on Slack, Pagerduty or Hipchat, and directly open a JIRA ticket with all the available error analysis data.
Bottom line: Collaborative workflows speed up issue resolution times.
Step #11: There’s hope
Modern developer tools are taking big steps to improve on the current state of monitoring. Whether it’s in the field of logs, application performance management or the new categories that are in the works.Bottom line: Keep an eye out for developments in the tooling ecosystem and best practices from other companies.
Step #12: Spread the word
Monitoring is an inseparable part of software development, let’s keep the discussion going!We hope you’ve enjoyed this overview / rant of some of the main problems with the current state of monitoring. Are there any other issues with monitoring that keep you up at night?
Please feel free to share them in the comments section below.
It’s easy to document your Play Framework REST API with Swagger
- This post originally ran on http://swagger.io (7/30/2015)
In order to simplify things, I have started off with an existing Play Framework, Java, JPA, REST project created by James Ward . James’ project is located on GitHub so you should pull it before you start with this how-to.
How-To Steps
- First,
add the dependencies to your build.sbt. I was able to solve a
dependency problem with the version of Play Framework 2.3.0 used in
the sample project and swagger-core by referring to GitHub issue 55o: https://github.com/swagger-api/swagger-core/issues/550.
"com.wordnik" %% "swagger-play2" % "1.3.12" exclude("org.reflections", "reflections"), "org.reflections" % "reflections" % "0.9.8" notTransitive (), "org.webjars" % "swagger-ui" % "2.1.8-M1" - Add this to your configuration application.conf :
api.version="1.0" swagger.api.basepath="http://localhost:9000" - Add the api-docs routes to the routes file:
- Add Swagger Annotations to the ToDoController ( @Api ):Then the Annotations for the GET and POST methods:
@Api(value = "/api/todos", description = "Operations with Todos") @Security.Authenticated(Secured.class) public class TodoController extends Controller {
@ApiOperation(value = "get All Todos", notes = "Returns List of all Todos", response = Todo.class, httpMethod = "GET") public static Result getAllTodos() { return ok(toJson(models.Todo.findByUser(SecurityController.getUser()))); } @ApiOperation( nickname = "createTodo", value = "Create Todo", notes = "Create Todo record", httpMethod = "POST", response = Todo.class ) @ApiImplicitParams( { @ApiImplicitParam( name = "body", dataType = "Todo", required = true, paramType = "body", value = "Todo" ) } ) @ApiResponses( value = { @com.wordnik.swagger.annotations.ApiResponse(code = 400, message = "Json Processing Exception") } ) public static Result createTodo() { Form<models.Todo> form = Form.form(models.Todo.class).bindFromRequest(); if (form.hasErrors()) { return badRequest(form.errorsAsJson()); } else { models.Todo todo = form.get(); todo.user = SecurityController.getUser(); todo.save(); return ok(toJson(todo)); } } - Start the application and go to this URL in your browser:
http://localhost:9000/assets/lib/swagger-ui/index.html?/url=http://localhost:9000/api-docs
GET / controllers.Assets.at(path="/public", file="index.html")

GET /api-docs controllers.ApiHelpController.getResources

POST /login controllers.SecurityController.login() POST /logout controllers.SecurityController.logout()

GET /api-docs/api/todos controllers.ApiHelpController.getResource(path = "/api/todos")
GET /todos controllers.TodoController.getAllTodos()
POST /todos controllers.TodoController.createTodo()

# Map static resources from the /public folder to the /assets URL path
GET /assets/*file controllers.Assets.at(path="/public", file)
Source Code
As mentioned in the beginning, I started with James Ward’s play-rest-security on githuband made these modifications on my fork. For all who are interested, here is the source code:Friday, August 19, 2016
Manage your API Keys with Java, Jersey, and Stormpath
If you are a Java developer, then you are undoubtedly familiar with
frameworks such as Spring, Play!, and Struts. While all three provide
everything a web developer wants, I decided to write a RESTful web application using the Jersey framework. This sample app uses Java + Jersey on the back-end and Angular JS on the front-end.
Jersey annotation service makes it easy to do routing, injection, and other functions important to a RESTful web application. My goal was to demonstrate the use of the Stormpath Java SDK for user management and the protection of a REST endpoint using API Keys and Oauth Tokens, all while relying on Jersey.
You can check out the Stormpath Jersey sample app in github, and follow along here for the implementation details and concepts I found most important while building this application. I will explain Stormpath SDK calls, Jersey annotations, and the general flow of the application, so it the codebase is easy to decipher.
Let’s code!

As soon as a user enters their credentials and clicks the “Sign In” button, an AJAX request is made to the
User authentication is done by first creating an
We use Jersey’s

If a client is trying to get an API Key without being logged in, they will get a

Let’s take a look at the code:
Notice the 10 lines of code right after the
To do this we use a
When we generated our Oauth token in the sceenshot above, we gave access to view weather in London, Berlin, and San Francisco. Thus we can view London’s weather using Oauth:

However, since San Mateo was not included in the scope of the Oauth token, we cannot see its weather:

Jersey annotation service makes it easy to do routing, injection, and other functions important to a RESTful web application. My goal was to demonstrate the use of the Stormpath Java SDK for user management and the protection of a REST endpoint using API Keys and Oauth Tokens, all while relying on Jersey.
You can check out the Stormpath Jersey sample app in github, and follow along here for the implementation details and concepts I found most important while building this application. I will explain Stormpath SDK calls, Jersey annotations, and the general flow of the application, so it the codebase is easy to decipher.
Let’s code!
Login
Stormpath provides username/password authentication in three lines of Java SDK method calls. That makes it very simple to launch a basic login form, securely.As soon as a user enters their credentials and clicks the “Sign In” button, an AJAX request is made to the
/login endpoint. Let’s take a look at the server side login code:
@Path("/login")

public class Login {


@Context

private HttpServletResponse servletResponse;


@POST

@Consumes(MediaType.APPLICATION_JSON)

public void getDashboard(UserCredentials userCredentials)

  throws Exception {


  Application application = StormpathUtils.myClient.getResource(

    StormpathUtils.applicationHref, Application.class);


  AuthenticationRequest request = new UsernamePasswordRequest(

    userCredentials.getUsername(), userCredentials.getPassword());


  Account authenticated;


  //Try to authenticate the account

  try {

   authenticated = application.authenticateAccount(request).getAccount();


  } catch (ResourceException e) {

    System.out.println("Failed to authenticate user");

    servletResponse.sendError(401);

    return;

  }


  Cookie myCookie = new Cookie("accountHref", authenticated.getHref());

  myCookie.setMaxAge(60 * 60);

  myCookie.setPath("/");

  myCookie.setHttpOnly(true);

  servletResponse.addCookie(myCookie);

  }

}
Here we see three examples of Jersey’s annotation feature. The @Path
annotation acts as our router. The @Context annotation injects the HTTP
Request object into our class. Finally, the @POST specifies the CRUD
operation.User authentication is done by first creating an
Application object, creating an AuthenticationRequest object, and finally calling application.authenticationAccount(request) to ask Stormpath to authenticate this account.Create Account
Creating an account is just as simple as logging in to the service:
@Path("/makeStormpathAccount")

public class StormpathAccount {


@POST

public void createAccount(UserAccount userAccount) throws Exception {


  Application application = StormpathUtils.myClient.getResource(

    StormpathUtils.applicationHref, Application.class);

  Account account = StormpathUtils.myClient.instantiate(Account.class);


  //Set account info and create the account

  account.setGivenName(userAccount.getFirstName());

  account.setSurname(userAccount.getLastName());

  account.setUsername(userAccount.getUserName());

  account.setEmail(userAccount.getEmail());

  account.setPassword(userAccount.getPassword());


  application.createAccount(account);

  }

}
All we had to do here, was create an Application and an Account, set the Account attributes, and call createAccount.Generating an API Key ID/Secret
Once a user logs in, they will be given API Key credentials. In this application, generation of the Keys is a simple AJAX call to/getApiKey:
@Path("/getApiKey")

public class Keys {


@Context

private HttpServletRequest servletRequest;


@Context

private HttpServletResponse servletResponse;


@GET

@Produces(MediaType.APPLICATION_JSON)

public Map getApiKey(@CookieParam("accountHref") String accountHref) throws Exception {


  Account account = StormpathUtils.myClient.getResource(accountHref,

    Account.class);


  ApiKeyList apiKeyList = account.getApiKeys();


  boolean hasApiKey = false;

  String apiKeyId = "";

  String apiSecret = "";


  //If account already has an API Key

  for(Iterator<ApiKey> iter = apiKeyList.iterator(); iter.hasNext();) {

     hasApiKey = true;

     ApiKey element = iter.next();

     apiKeyId = element.getId();

     apiSecret = element.getSecret();

  }


  //If account doesn't have an API Key, generate one

  if(hasApiKey == false) {

     ApiKey newApiKey = account.createApiKey();

     apiKeyId = newApiKey.getId();

     apiSecret = newApiKey.getSecret();

  }


  //Get the username of the account

  String username = account.getUsername();


  //Make a JSON object with the key and secret to send back to the client

  Map<String, String> response = new HashMap<>();


  response.put("api_key", apiKeyId);

  response.put("api_secret", apiSecret);

  response.put("username", username);


  return response;

}

}
We use Jersey’s
@CookieParam annotation to grab the account Href from the Cookie that was created at login. We create an account, and an ApiKeyList
object. We then check if this account already has an API Key. If so,
our job is to simply request it from Stormpath; if not, we tell
Stormpath to make a new one for this account and return this back to the
client. By Base64 encoding the API Key:Secret pair, a developer can now
target our endpoint using Basic authentication:Using a Jersey Filter
A cool feature of the Jersey framework is its Request filter. By implementingContainerRequestFilter
we can intercept an HTTP request even before it gets to our endpoint.
To demonstrate, I added an additional level of security around API Key
generation. Before a user is allowed to target the /getApiKey
endpoint they must pass through the Jersey request filter, which will
check if the client is actually logged in (a.k.a has a valid session in
the form of a cookie).
@Provider

public class JerseyFilter implements ContainerRequestFilter {


@Context

private HttpServletResponse servletResponse;


@Override

public void filter(ContainerRequestContext requestContext) throws

  IOException {


  URI myURI =  requestContext.getUriInfo().getAbsolutePath();

  String myPath = myURI.getPath();


  if(myPath.equals("/rest/getApiKey")) {

    Iterator it = requestContext.getCookies().entrySet().iterator();

    String accountHref = "";


    while(it.hasNext()) {

      Map.Entry pairs = (Map.Entry)it.next();


      if(pairs.getKey().equals("accountHref")) {

       String hrefCookie = pairs.getValue().toString();

       accountHref =

        hrefCookie.substring(hrefCookie.indexOf("https://"));

      }

        }

    if(!accountHref.equals("")) {

      //Cookie exists, continue.

      return;

    }

    else {

      System.out.println("Not logged in");

      servletResponse.sendError(403);

    }

  }

}

}
If a client is trying to get an API Key without being logged in, they will get a
403 before even reaching the actual endpoint.Exchanging your API Keys for an Oauth Token
Want even more security? How about trading your API Key for an Oauth Token? Using Oauth also brings the functionality ofscope, which we can use to allow users to get weather from specified cities.Let’s take a look at the code:
@Path("/oauthToken")

public class OauthToken {


@POST

@Produces(MediaType.APPLICATION_JSON)

@Consumes(MediaType.APPLICATION_FORM_URLENCODED)

public String getToken(@Context HttpHeaders httpHeaders,

                       @Context HttpServletRequest myRequest,

                       @Context final HttpServletResponse servletResponse,

                       @FormParam("grant_type") String grantType,

                       @FormParam("scope") String scope) throws Exception {


/*Jersey's request.getParameter() always returns null, so we have to

    reconstruct the entire request ourselves in order to keep data

See: https://java.net/jira/browse/JERSEY-766

*/


  Map<String, String[]> headers = new HashMap<String, String[]>();


  for(String httpHeaderName : httpHeaders.getRequestHeaders().keySet()) {

    //newBuilder.header(String, String[]);

    List<String> values = httpHeaders.getRequestHeader(httpHeaderName);

    String[] valueArray = new String[values.size()];

    httpHeaders.getRequestHeader(httpHeaderName).toArray(valueArray);

    headers.put(httpHeaderName, valueArray);

  }


  Map<String, String[]> body = new HashMap<String, String[]>();

  String[] grantTypeArray = {grantType};

  String[] scopeArray = {scope};


  body.put("grant_type", grantTypeArray );

  body.put("scope", scopeArray);


  HttpRequest request = HttpRequests.method(HttpMethod.POST).headers(

    headers).parameters(body).build();


  Application application = StormpathUtils.myClient.getResource(

    StormpathUtils.applicationHref, Application.class);


  //Build a scope factory

  ScopeFactory scopeFactory = new ScopeFactory(){

    public Set createScope(AuthenticationResult result,

      Set requestedScopes) {


      //Initialize an empty set, and get the account

      HashSet returnedScopes = new HashSet();

      Account account = result.getAccount();


        /***

        In this simple web application, the scopes that were sent in the

        body of the request are exactly the ones we want to return. If

        however we were building something more complex, and only wanted

        to allow a scope to be added if it was verified on the server

        side, then we would do something as shown in this for loop. The

        'allowScopeForAccount()' method would contain the logic which

        would check if the scope is truly allowed for the given account.


        for(String scope: requestedScopes){

                if(allowScopeForAccount(account, scope)){

                    returnedScopes.add(scope);

                }

            }

        ***/


      return requestedScopes;

    }

  };


  AccessTokenResult oauthResult = application.authenticateOauthRequest(

    request).using(scopeFactory).execute();


  TokenResponse tokenResponse = oauthResult.getTokenResponse();


  String json = tokenResponse.toJson();


  return json;

}

}
Notice the 10 lines of code right after the
getToken() declaration. This is a workaround for Jersey’s lack of providing us with a complete request object. Calling request.getParamter() or request.getParameterMap() will always return null, and since creating an AccessTokenResult object requires the Request object with the body still intact, we must recreate the entire request ourselves.Finally: Securing your REST endpoint
Ahh, the moment we’ve all been waiting for. Now that we have given our users the ability to target this weather endpoint using Basic and Oauth authentication, it is up to us to figure out which protocol they choose to use.
@Path("/api/weather/{city}")

public class WeatherApi {


@Context

private HttpServletRequest servletRequest;

@Context

private HttpServletResponse servletResponse;


private String weatherResult;


@GET

@Produces(MediaType.APPLICATION_JSON)

public String getWeatherApi(@PathParam("city") final String myCity)

  throws Exception {


  Application application = StormpathUtils.myClient.getResource(

    StormpathUtils.applicationHref, Application.class);


  System.out.println(servletRequest.getHeader("Authorization"));


  //Make sure this use is allowed to target is endpoint

  try {

    ApiAuthenticationResult authenticationResult =

      application.authenticateApiRequest(servletRequest);


    authenticationResult.accept(new AuthenticationResultVisitorAdapter() {


      public void visit(ApiAuthenticationResult result) {

        System.out.println("Basic request");


        URL weatherURL = getURL(myCity);


        //Parse weather data into our POJO

        ObjectMapper mapper = new ObjectMapper();


        mapper.configure(DeserializationConfig.Feature.FAIL_ON_UNKNOWN_PROPERTIES, false);


        City city = null;


        try {

           InputStream in = weatherURL.openStream();

           city = mapper.readValue(in, City.class);


        } catch (IOException e) {

            e.printStackTrace();

        }


        weatherResult = city.toString() + " °F";

      }


      public void visit(OauthAuthenticationResult result) {


        //Check scopes

        if(result.getScope().contains("London") && myCity.equals("London")){

          weatherResult = getWeather(myCity) + " °F";;

        }

        else if(result.getScope().contains("Berlin") && myCity.equals("Berlin")){

          weatherResult = getWeather(myCity) + " °F";;

        }

        else if(result.getScope().contains("SanMateo") && myCity.equals("San Mateo")){

          weatherResult = getWeather(myCity) + " °F";;

        }

        else if(result.getScope().contains("SanFrancisco") && myCity.equals("San Francisco")){

          weatherResult = getWeather(myCity) + " °F";;

        }

        else {

          try {

            servletResponse.sendError(403);

          } catch (IOException e) {

            /* To change body of catch statement use File | Settings | File Templates.*/

            e.printStackTrace();

          }

        }

      }

    });


  return weatherResult;


} catch (ResourceException e) {

  System.out.println(e.getMessage());

  servletResponse.sendError(403);

  return "Cannot authenticate user.";

}

}
To do this we use a
visitor. We create a visitor for
each type of authentication protocol that we expect our clients to use
(in our case Basic and Oauth). Based on the type of the ApiAuthenticationResult object, the appropriate visitor will be targeted. Notice how inside the OauthAuthenticationResult visitor, we check the scope of the Oauth token that we received, and appropriately give/forbid access to the requested cities.When we generated our Oauth token in the sceenshot above, we gave access to view weather in London, Berlin, and San Francisco. Thus we can view London’s weather using Oauth:
However, since San Mateo was not included in the scope of the Oauth token, we cannot see its weather:
Conclusion
Jersey is yet another Java framework that seamlessly integrates with the Stormpath SDK to offer user management, API Key management, Oauth, and more. If you’d like to see more code and even run this application yourself please visit: https://github.com/rkazarin/sample-jersey-webapp
Subscribe to:
Posts (Atom)